LimbX: an AR controlled supernumerary limb
- Alice Cai
- Nov 30, 2022
- 6 min read
Updated: Oct 26, 2023

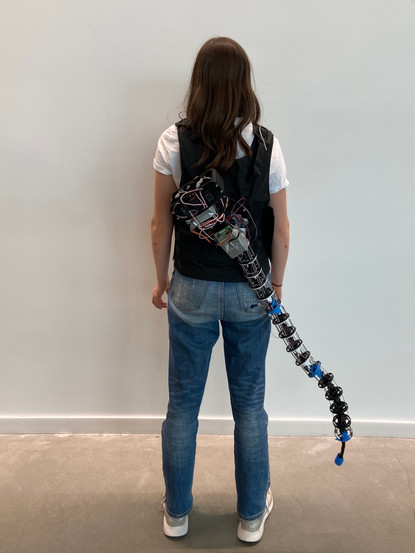
Aida wearing LimbX Prototype 3 on her back
Overview
How do we control an arm easily that does biologically not belong to us? Supernumerary robotic limbs (SRLs) have the potential to improve human abilities by extending the range and number of actions that can be performed. However, the existing control interfaces for SRLs are low-level, requiring a high cognitive load for users. We developed a novel augmented reality (AR)-controlled continuum supernumerary robotic limb (ARCCSRL) that allows users to deliver high-level control commands using eye-gaze input supported by secondary voice commands.
Developing a custom continuum SRL from scratch, it was purposefully designed to be distinct from native human limbs in order to explore control and embodiment of body parts that not only do not belong to humans but also are unfamiliar in form factor. The continuum SRL consists of three modular segments made of custom rigid vertebrae connected by U-joints and connected by a flexible spine, independently actuated using a servo-driven tendon system. A custom controller was developed for the SRL through training and optimizing both a forward and inverse machine learning (ML) model on servo angle-end effector mapping. To allow users to control the SRL, we developed both a manual joystick-based control system and a novel AR control system. Delivered through the HoloLens headset, the AR control system integrates the eye tracking and voice recognition for high-level intention-based control.


Aida and Alice presenting limbX at the Harvard Design Fair, Wednesday May 3rd 2023
As part of the development of the limb, we have conducted studies on the controller interface through eye gaze and voice control.
LimbX Prototype 3 | Moving the supernumerary limb with your eyes
Timeline
Summer 2022 - Fall 2022: LimbX started as an idea in the summer of 2022. We wanted to explore novel systems for movable limbs. The end goal was to have a system robust enough that we could wear it on our back and pick up a cup of boba. Alice, Anhphu, Caine, Aryan, and Vik began working on a Hardware prototype and the software system to control the servos manually.


February 2023 - present: After a several month hiatus, Alice, Aida and Vik revitalized the project. Vik worked on rebuilding the entire hardware system with U-joint design and a new string mechanism together. Aida and Alice then came up with the control and AR system over the course of these months, resulting in a fully functioning robotic limb!


How We Built It
Hardware/Software Design
We built the continuum supernumerary robotic limb (SRL) from scratch. The continuum SRL comprises three modular segments constructed with custom rigid vertebrae connected by U-joints and a flexible spine. These segments are independently actuated through a servo-driven tendon system. Whereas controllers for SRL are usually designed using inverse kinematics, we have used a machine learning (ML) model mapping position and servo angle-end effector position together. Together with the AR control system using a Microsoft Hololens, we incorporated eye tracking and voice recognition to enable high-level intention-based control.
Hardware Development
Adapting the structures from The Bootup Guide to Homebrew Two-Stage Tentacle Mechanisms, we developed several iterations of hardware prototypes using a combination of off-the-shelf electronics and custom-built parts. Because prior continuum robots were built on smaller scales with fewer segments, we had to replace materials and adapt designs from our references.
The SRL consists of three modular segments, each composed of custom 3D-printed PLA disks (vertebrae), attached to U joints that provide structural and rotational strength to the robotic limb, fitted on top of polyurethane tubing (spine). The disks feature openings around the outer perimeter for the conduits and tendons that actuate the robot, and also feature a central cross design that enables reduction of material without compromising structural stability. The polyurethane material for the spine, as well as the U-joint design, were custom chosen and optimized through several rounds of hardware testing and iteration.


The three segments are independently actuated using a servo-driven conduit-tendon system along two planes, with a large central servo controlling the overall orientation of the SRL. The servos are housed in a custom 3D-printed housing array, featuring two rows of three tightly fitted servo openings through which six 25kg servos are screwed in place and attached to six pulleys that propagate servo angle rotation to tendon movement. The tendons are made of 1/16’’ steel wire rope, secured relative to the pulley system using crimp terminals fitted into the tail end of the pulley. Each servo drives movement across a single plane along a single segment, controlling the two metal tendons on each side of the robot within the given segment and plane. The metal tendons in the second and third segments are housed in extension spring conduits that allow isolation of each segment in actuation. At the end of the SRL, we fixed an electromagnet that is turned on based on the User's input.
Actuation Circuit Design
There are two general circuit parts that are used to control and actuate the SRL. We used a 16-Channel 12-bit Servo Driver to control the array of servo motors. Servo drivers are an intermediary between the control system and servo motors, providing precision control and distributing power across multiple servo motors.

Using a MOSFET and an external 9V power supply, the electromagnet can be directly controlled from the Raspberry Pi.

Machine Learning Controller
Data Collection
Instead of a traditional kinematics-based controller, we trained a neural network to predict the needed servo angles for a desired location. We developed a data collection rig consisting of an overhead camera to collect video data of the limb configurations at different combinations of servo angles. We sweeped a large parameter space of servo angles, with over 800 data points and developed a computer-vision based post-processing system to level the alignment, segment the joints and end effectors, and map the pixel positions to real world dimensions.


Plotting our set of collected data, we can see an elliptic configuration space in which the robotic limb moves.

Machine Learning Model
For this complex problem, we decided to train two neural networks. The first one - forward model - predicts the end-effector position based on the servo angles we input. We used a standard multilayer perceptron neural network with ReLu activation functions, and trained it using the Adam optimizer with mean-squared-error loss (MSE). Performing hyperparameter search on the hidden layer depth and width, the regularization term, learning rate, and epoch number, we found the optimal neural network structure that minimizes our MSE loss function.
![Forward neural network Structure. Dimensions are: Input: 3, Hidden Layers: [4,8,16,32,8,4], Output: 2. We see a bunch of nodes and edges representing the neural network in graphical form.](https://static.wixstatic.com/media/65ae04_f71b0b5864f344b095432f5748690b29~mv2.png/v1/fill/w_49,h_38,al_c,q_85,usm_0.66_1.00_0.01,blur_2,enc_avif,quality_auto/65ae04_f71b0b5864f344b095432f5748690b29~mv2.png)
Using this forward neural network, we then trained an inverse neural network that would actually predict the servo motor angles based on the desired location we want the limb to move to. Similarly to the forward Neural network, we are performing hyperparameter search to find the ideal architecture. However, the key difference is our loss function. The loss function is the euclidean distance between the training data position and the predicted position from the forward neural network based on the predicted angles from our inverse neural network.
![Inverse Neural network Structure. Dimensions are: Input: 2, Hidden Layers: [32,16,8,4], Output: 3](https://static.wixstatic.com/media/65ae04_2adf2b49d1df47b1a0172e0bdcd20bb5~mv2.png/v1/fill/w_49,h_46,al_c,q_85,usm_0.66_1.00_0.01,blur_2,enc_avif,quality_auto/65ae04_2adf2b49d1df47b1a0172e0bdcd20bb5~mv2.png)
Using the trained inverse neural network, we can now predict the servo angles needed to get a desired (x,y) position. Running the network on the testing data and plotting the predictions in a scatter plot, we see similarity to our initial elliptic training data shape.

We now have a Machine Learning algorithm that can predict the servo angle positions needed to get to a desired position. If you are interested in the code and want to take a look, see here.
AR User Control System
The user control system operates on a HoloLens AR headset and consists of a calibration module, an eye gaze tracker, a voice recognition module, a networking module, and visual and audio cues to provide feedback to user actions. The calibration module allows researchers to align the AR world with real world dimensions and orientations, and consists of five spherical markers for the origin and four corners of the table that researchers can align with the corners and origin of the real experiment table. This allows translation of target positions in AR into the real world coordinate system. The user’s eye gaze directs the SRL toward a target object or location. The eye tracking is visually displayed back to the user by a subtle spherical white marker.
Upon recognition of specific vocal commands, the AR system interprets user intention and sends a networking signal to the Raspberry Pi to actuate the SRL. The user can command the limb to “Go there”, which will trigger the SRL to move to the location the user is targeting with their eye gaze, “Grab that”, which will trigger the SRL to both move to the target location and turn on the electromagnetic grabber, or “Release”, which will turn off the electromagnetic grabber. Upon recognition of the command, the system gives both visual and audio feedback – in particular, a distinct sound effect plays for each command, the white marker becomes brighter and more opaque to solidify the target position selected, and a textual transcription of the recognized command appears above. The gaze and vocal modalities are integrated into a single control language designed through iterative design processes, incorporating user experience insights from sandbox testing.

General Summary
